
How to make a Tumblr Style Graphic / Edit
These are actually surprisingly easy and don't consume much time or thinking (meaning, yes they are pretty mindless to be honest)
How to make something like this:
 |
| (Haesica) SNSD's Jessica + Super Junior's Donghae |
Lets begin:
I'm going to start with a png of Uee (of After School)

the background of this picture has already been removed which makes editing a lot easier.
- File > New or CTRL- N and make a new file with the width of 537 and the height of 360 Copy and paste your picture onto the new document and delete the white background.
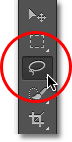
- Now, using the Lasso tool (on the skinny left panel)
 cut off the part of the body you don't want to use
- This is what i now have

its a slanted cut, which i purposely intended. ( you should aim for an uneven cut opposed to a straight one to give your overall image more depth)
- Then add a background. I think nature backgrounds work really well for these type of edits so i tend to stick with them.

Here is mine after copy & pasting the background behind the image:

- Now i'm going to play with the coloring on the girl's layer (Uee's) because the colors of her and the background clash
- Image > Adjustments > Curves
(Channel RBG) Output: 160 Input: 123
This will make Uee lighter and blend into the background.
The difference is subtle, but in the end makes a difference.
.png)
- Now copy & paste this ON TOP of the other two layers
Set its mode to multiply

Copy & Paste this new black texture ON TOP of all the layers
set its mode to lighter color
.jpg)
Copy & Paste this other texture ON TOP of only the background layer NOT your person's layer
Set its mode to color burn
.jpg)
This is what mine looks like now.

You can pretty much just finish here, but i'm going to make a few final tweaks.
Such as lowering the saturation of the background layer until it has more of a grey hue.
Image > Adjustments > Hue & Saturation
Saturation: -63
And then i'm going to paste premade text ON TOP of all the layers


But its hard to read the text, so i'm going to brighten Uee's layer with curves.
Image > Adjustments > Curves
Output: 66 Input: 0
Then i'm going to double click Uee's layer on the right layers panel to open the layer style window.
On the left side of the new window, check "drop shadow" to give the layer a more pop out effect.

Flatten everything.
Extras:
- Filter > Sharpen > Smart Sharpen
- Layer > New Fill Layer > Gradient
- You can always add extra textures and coloring if you'd like to polish your image.
I'm not going to in this case, because i'll just keep it simple
Here is the final result:

where do you get pictures without backgrounds?
ReplyDeleteyou search png
Delete