Showing posts with label photoshop tutorial. Show all posts

Monday, August 12, 2013

Photoshop Tutorial | How to Make Bokehs with Images

Making Bokehs with Images

( Using Field Blur)


with these bokehs you can use them as textures 
or just show them off the way they are

this tutorial depends heavily on the photo's individuality, 
so be prepared to adjust levels to your own photo's needs


Example:

From this:


To This:


Lets begin:

Here is my photo that i will use.

1) Open up your image in Photoshop

2) Filter > Blur > Field Blur

3) Go to Blur Effects

(on the bottom half of the right panel)
make sure "bokeh" is checked

4) Increase the Light Bokeh 

the higher the percentage, the closer the individual bokeh circles come together
and the brighter the bokeh becomes

mine is set at 92%, but that can always change depending on your chosen photo
& your personal preferences / taste in bokehs

5) Increase the Bokeh Color 

but make sure the color doesn't become too bright or an eyesore
mine is set at 42%, but that can always change depending on your chosen photo
& your personal preferences / taste in bokehs

6) Go to Light Range, bring the white arrow closer to the black arrow

for mine, i'm dragging the white arrow till it overlaps the black arrow

if you move the black arrow (and the white arrow that overlaps the black arrow)
towards the left hand side of the spectrum
your bokeh will become darker

7) Go to Blur Tools

(right above Blur Effects)

8) Under Field Blur, increase the Blur amount

the more you increase it, the bigger the individual bokeh circles become

mine is set at 54 px, but that can always change depending on your chosen photo
& your personal preferences / taste in bokehs

8) Hit Okay

Here is my final (rough) product


and another one, i made with the same image


personally, i think the one i made for the example looks much better
and is better suited for a texture

that is because the bokehs are bigger

and the orginal image as less variation in details  
'(something to keep in mind)

Photoshop Tutorial | How to Use Content Aware Fill (Removing unwanted objects)

Using Content Aware Fill

( To Remove Unwanted Objects)


It's much easier than you would think, trust me.

Example: 
(removing a hand from a image)

From this:

i will be using a screencap from the korean movie "Heaven's Postman" 


To this:


Lets begin:

So i'm beginning with this image:


1) Open up your image on photoshop

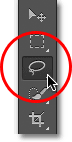
2) Select the Lasso Tool
3) Using the Lasso Tool, draw a shape around the "object" you want to get rid of.

 (aka make a selection)

In my case, i drew around the hand.

Make sure your selection is loose / rough.

here is my selection

Its not suppose to be perfect and that's what we want.

Make sure you include some of the background in your selection.

4) Right Click the center of your selection
(aka the "object" you want to get rid of)

then click Fill
(a small window will pop up)

Under the Content selection you will see "Use" and a bunch of scroll down options. 

Pick Content Aware
Hit okay

5) Select > Deselect

And there you have it! Simple & very useful.

Your unwanted object is gone from the image.


Momo Cookie with Photoshop

this is Momo. his nickname is Minister Mo (named after Jang Ok Jung's Minister Min, don't ask me why okay, it just kind of caught on)

Introducing Momo, my 99% devil / 1% adorable angel, puppy.

I followed this tutorial from Smashinghub.com that teaches you how to make a realistic cookie via photoshop. Go try it if you have time.

I simply added an extra step at the end: an addiction of Momo.

Thursday, August 8, 2013

Photoshop Tutorial | How to color dull gifs (jdramas coloring)

How to color dull gifs (jdramas coloring)


Coloring jdramas and cable channel kdramas is pretty frustrating works because the gifs always come out dull and dark, a very unattractive combination. 

But brightening the gifs and giving them a more "angelic" vibe, mostly requires patience and lots of lots of gradients.


For this tutorial you will need basic gif making knowledge:

(here have some todapi. gifs of Erika Toda and Yamapi )
This are some finished products, if you want to see how dull the gifs were before, take a look at these screencaps.

Original:

Let's begin:
Start with your basic gif.
1) Add a gradient.


I am adding a blue to white gradient fill 
because i want to enchance the colors of the
ocean in the gif.

Set this gradient fill to soft light.
2) Rasterize gradient & Erase

if you don't know how to rasterize the gradient,
you can simply click the eraser
and then click the gif screen
then it will ask you to rasterize the layer
click yes

you have to rasterize or else it won't let you erase

as for the erasing part
i'm going to erase the parts where the blue touches Erika and Yamapi

make sure you are using a soft-headed brush
my brush's opacity is set to 60%, 
so i can have an easier control on eraser
and still leave some of the blue color behind

as you can see here, the blue overlaps their faces which i don't want. so i need to erase in these areas

3) Add curves
( to brighten image)
my curves are the usual upward slope shape
but make sure to adjust your curves to your gif's own needs

4) Add another gradient

This time it will be a white to transparent gradient fill
Keep its layer mode on normal, but lower its opacity to around 50%
do the same as the blue gradient fill above
and erase places you don't want it to be


5) And another gradient

i'm adding a white to brown gradient fill
(or you could do brown to white and set the angle to -90 degrees)
because i want the rock's colors to show up more

rasterize / erase the parts you don't want the fill to overlap
for example. i will erase where the brown color touches Erika & Yamapi

6) Hue and Saturation

Simply tweak the colors 
increase the lightness of the colors you want more noticed
and decrease the lightness of the colors you don't want noticed

if you want to change to hues of the some colors
go ahead

in my case
i tweaked the blue to my liking

Final Product:


Saturday, August 3, 2013

Photoshop Tutorial | How to make a Tumblr Style Graphic / Edit


 How to make a Tumblr Style Graphic / Edit


These are actually surprisingly easy and don't consume much time or thinking (meaning, yes they are pretty mindless to be honest) 


How to make something like this:
(Haesica) SNSD's Jessica + Super Junior's Donghae

Lets begin:

I'm going to start with a png of Uee (of After School)
the background of this picture has already been removed which makes editing a lot easier.

  • File > New or CTRL- N                                                                                                    and make a new file with the width of 537 and the height of 360                                        Copy and paste your picture onto the new document and delete the white background.
  • Now, using the Lasso tool (on the skinny left panel)                                                               cut off the part of the body you don't want to use

  • This is what i now have


its a slanted cut, which i purposely intended. ( you should aim for an uneven cut opposed to a straight one to give your overall image more depth)

  • Then add a background. I think nature backgrounds work really well for these type of edits so i tend to stick with them.


Here is mine after copy & pasting the background behind the image:

  • Now i'm going to play with the coloring on the girl's layer (Uee's) because the colors of her and the background clash

  • Image > Adjustments > Curves
(Channel RBG) Output: 160 Input: 123

This will make Uee lighter and blend into the background.
The difference is subtle, but in the end makes a difference.
  • Now copy & paste this ON TOP of the other two layers

Set its mode to multiply 
  • I have this

Friday, July 26, 2013

Photoshop Tutorial | Watercolor Splash Effect

Watercolor Splash Effect Tutorial

Level : Intermediate 

Note: If you want to download/preview a larger version of an image below, simply drag and drop into the search bar.

When choosing an image, look for images with a white background or preferably already in png form. This will be more convenient as we go along.


How to make something like this: 


From a normal picture like this


Another example:
(nana from after school)


Let's beginning:


You can either follow along and download the pictures i use or use your own resources
Okay i am going to start with this picture of Krystal.


after re-sizing it looks like this


Image > Adjustments > Threshold

I set my threshold level at (181) but every picture needs a different level. You want to adjust the level until the person's features are well defined in black.

For lighter images, adjust more towards the right

Here is how mine looks now:


Next i will be using this purple watercolor texture:

Copy & Paste this over the image you are working with
then set it's mode to "lighten"

This is what mine looks like now


You can move it around if you'd like. I moved mine, so the head looks a bit chipped off which turns out to add to the watercolor illusion nicely.

Then copy & paste this lovely rainbow texture on to your picture


set it's mode to "lighten"

i moved mine towards the top & erased bits on the bottom

to get this:


Next add this canvas texture


Set it to "multiply"

then

image > adjustments > hue & saturation

optional:
i lowered the saturation
& increased the light
only because i feel that the grey color is too strong

current result:


Next, i'm going too add a few more watercolor textures
to make the picture more colorful

Do the same with them as above.
(Copy + Paste, Mode --> Lighten)

Try moving them around, 
erasing bits
playing with hues & levels


Product so far:

Now i'm going to Copy & Paste
this file


Then change its layer mode to

"Darken"


but, the face is now covered with little marks
which is cumbersome to the eyes
& a bit crowded

so, i am going to take a 

"soft tip brush"

and lightly erase
the marks on the face

then i'm going to change
the 

hue & saturation 
(image > adjustments >hue & saturation)

and make the marks a more purple hue
this way, the colors aren't contrasting


we are pretty much done
minus a few final touches
(optional of course, but i prefer to make some minor tweaks)

i'm going to smart sharpen the 

amount: 42
radius: .7

and add a 

black & white gradient,
fade it (edit > fade gradient map)
mode: soft light
opacity: 58

and finally

selective color

here is my final result:


In my opinion, this is a quick & easy way to achieve an artsy effect on a photo.

Side note!


And if you have Topaz Clean, you can make it look even nicer

for example:


after topaz


Thank you for reading! Good luck with your editing! 


Monday, July 22, 2013

Photoshop Tutorial | Removing Watermarks

Removing Watermarks (Without Cropping)

Yes. Watermarks. About one of the most annoying little things that always happen to get in your way when you are editing a photo.

But removing them actually turns out to be a lot simpler than it sounds (luckily for us).


Here is the photo i will be starting with:

Suzy Bae (from the korean girl group missA, or my dearest maknae bby) 


As you can see, there is a big nuisance of a watermark in the bottom right.

So to get rid of this watermark (without cropping!)  we first need to start with the "spot healing brush tool". Which is seven down on your tool panel at the far left and looks like a bandage.


You can adjust the size, hardness, and spacing to your liking. Or just do what i do, and go with the default settings.


Click on that.

Next, zoom in on your watermark. 

And make light clicks around the watermark. 

The principle of the "Spot Healing Brush" is simple. It replaces the mark/object/blemish you want to get rid of with the background behind it. 

Its one of my favorite tools, but definitely nowhere near perfect. Sometimes you may have to click a few times at the same spot to get the result you want.


Here are some tips to consider:


1) When working with a close-to solid color in the background (ex: skin, sky, ground) you may drag the brush around & it will work fine. Not so much on an uneven surface however.

2) If you are working with "delicate" areas in which you do not want to disturb the background. Try making your brush head smaller, zooming in, and clicking on the desired areas you want to change.  

3) The "Spot Healing Brush", similiarly to the clone tool, is one of the most frustrating yet useful tools of Photoshop. Something to keep in mind.

Here is my result:


Its a little blotchy but it works. And plus, when you add your coloring, it's harder to notice the imperfections.

I spent around 5 minutes on this, but if you dedicate more time & effort, you can achieve a more flawless looking watermark-removed-pictures.

Here is my final result + a quick coloring:


This is one i did previously in the past (& spent more time on)

As you can see, you wouldn't have guessed there was a watermark in the first place.

I hope this was helpful and thank you for reading! If there is any confusions, feel free to drop a question below.